April 29, 2021

16x2 LCD Interface with Arduino using IIC Module

LCD Displays comes in different sizes. These displays are popular because they are easy to interface with. We had already interfaced 16x2 LCD with Arduino Microcontroller in our previous blog LCD Display Interface with Arduino.

There was one drawback. LCD Displays require a minimum of six pins. Most of the microcontroller does not have this much pins to bare. What if we need to interface two LCDs, that would cost twelve pins. To solve this issue we need the I2C Module.


With help of this module, we only need only the I2C bus. The advantage is multiple devices could be connected on one bus.


Things we need:

  • Arduino Uno
  • IIC Module for LCD Display
  • 16x2 LCD Display
  • 2mm Pitch 1x40 Female Berg Strip
  • 2mm Pitch 1x40 Male Berg Strip


Connection is simple, First using Berg Strip connect LCD Module with the IIC Module. Then using Jumper wire connect Arduino 5V pin to Modules VCC Pin, Arduino Gnd pin to Module Gnd Pin, Arduino A5 Pin to Modules SCL Pin, and Arduinos A4 Pin to I2C Modules SDA Pin as shown below.

LCD Module can be soldered directly with the IIC Module but this would create a problem if any of the two gets damaged. Otherwise, LCD can be brought together pre-soldered with the IIC Module.

Circuit Diagram:

After the connection is complete copy-paste and upload, the I2C scanner code. Then open the Serial Monitor there you will find the I2C address for your device. Note the IIC address.

I2C Scanner: 

Now Copy the code below to your Arduino IDE and Replace my IIC address (0x3F) with your IIC address that you noted ago. Then upload the code. And you should see the screen working. If nothing on the screen try to rotate the Potentiometer that you have on the IIC Module. That pot controls the Contrast of your display.

Before you upload the code library needs to be installed. Please follow the below mention instruction to install the library.
https://creativestudio1973.blogspot.com/2019/11/introduction-to-arduino-library-manager.html

Source Code:

Video:

April 28, 2021

IoT Using Blynk - Temperature and Humidity Monitoring

Value Display Widget is another widget that we are going to use today. It is used to display values. We are going to monitor Temperature and Humidity using this widget.

In our previous blog, we have interfaced the DHT22 Sensor with Arduino. Now in this blog, we send data to Blynk so that we could monitor it over IoT.

DHT 22 has a one-wire interface. In this project, we have connected DHT22 in the D2 pin of NodeMCU. Virtual Pin V1 and V2 are used for the Value Display Widgets. 

For this project, we need

  • NodeMCU
  • DHT22
  • Jumper Wires
  • Blynk App

 Add two Value Display Widgets, named as Temperature and Humidity. Set the Inputs as V1 for Humidity and V2 for Temperature as shown below.


Now open the IDE copy-paste the code. Carefully delete YourAuthToken and paste your auth code there. Then delete YourNetworkName and write your WiFi router or phone's hotspot name there. Finally, delete YourPassword and put your Wi-Fi or hotspot password. Then you can upload the code. Once uploaded your NodeMCU should get connected to your WiFi network.

Source Code:

Results:


How to make a Relay Board

Relay is a switch that can be actuated using an electrical signal. In this blog, we will discuss the operation of a relay and relay board along with the process of interfacing with different microcontrollers. There are many types of relays. We will discuss SPDT type. An SPDT relay has five terminals Normally Open (NO), Normally Close (NC), Common (C), A1 and A2 are used to power the coil. When the coil is powered contact between C and NC switches to NO side, this is called actuated state. 

Relays are used when we are using electrically isolated circuits. Like using a 5V DC Relay we can turn on 230V AC load. 

Things we need

  • SPDT Relay 5V (RL1)
  • NPN Transistor : BC547 (Q1)
  • Resistor : 1k Ohm (R1)
  • Diode : 1N4007 (D1)
  • LED Optional

In our project we can connect any micronontroller's pin at Input. 1k Ohm resistor is used to control the base current of the transistor Q1. D1 is a Freewheeling Diode. RL1 is the relay that is controlling the 12V Load.


Video:

February 13, 2021

IoT Using Blynk - Controlling Load using Push Button Widget

Before we controlled the Led Widget of the Blynk app. Now we will learn about the Button Widget and see how to change the circuit diagram so that we could control large electrical loads. This is a basic Home Automation Project.

For this project we need 

  • NodeMCU 

  •  Blynk App Installed in a Android Phone 

  •  Relay Board

  •  LED as Load

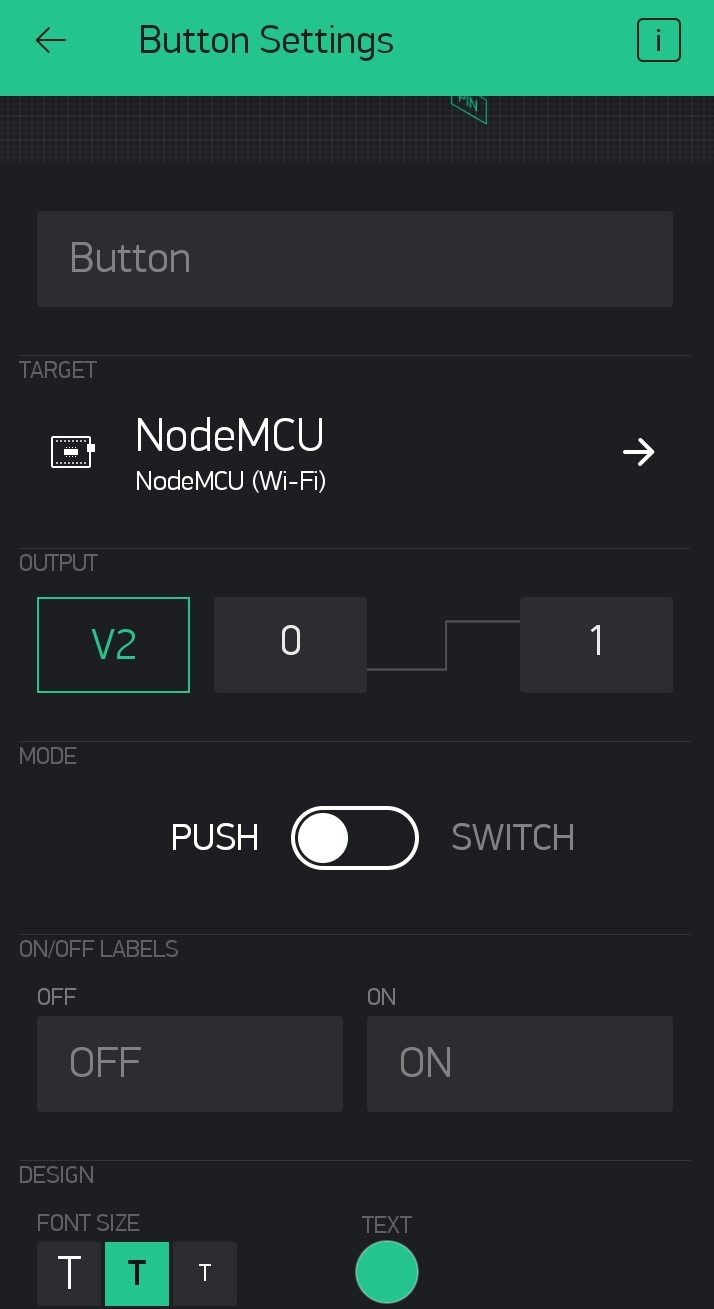
Please follow the Step by Step Blynk Installation Guide to install the Blynk app on your phone. Then add the Button Widget and LED Widget (optional). Then tap on the Button Widget and make V2 as the output as in the image below. 

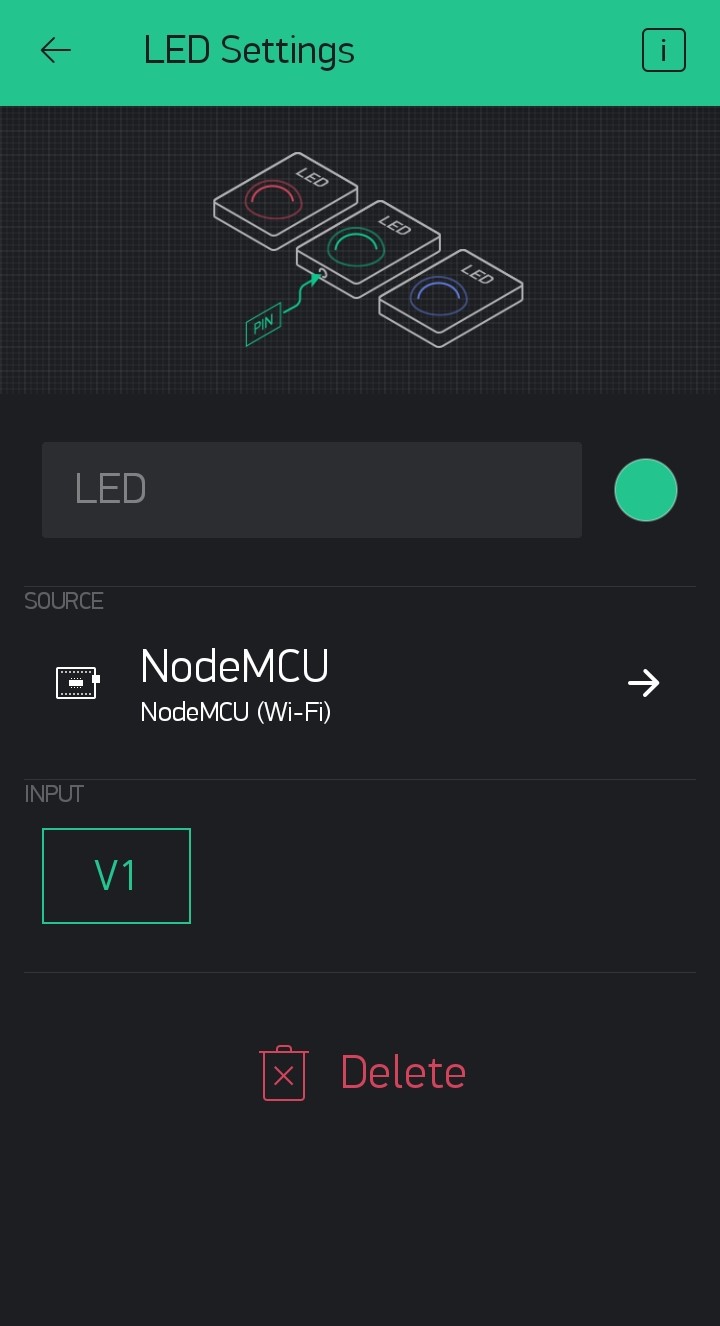
Then tap on the LED Widget and change V1 as the Input.


Then connect your node MCU to your desktop or laptop. If you are using NodeMCU for the first time then you have to add Node MCU to your Arduino IDE. Please follow the step-by-step tutorial for Programming NodeMCU Step by Step Using Arduino IDE.

Now open the IDE copy-paste the code. Carefully delete YourAuthToken and paste your auth code there. Then delete YourNetworkName and write your WiFi router or phone's hotspot name there. Finally, delete YourPassword and put your Wi-Fi or hotspot password. Then you can upload the code. Once uploaded your NodeMCU should get connected to your WiFi network.

Now if you tap on the Play at the top right corner the icon would turn to Stopand you will be able to see your device online.

Now use the Button on the Blynk app to control the LED on NodeMCU. 

The LED on the NodeMCU is connected to the GPIO2 or D4 pin of your NodeMCU. So if you connect a relay board at GPIO2 you will be able to control the relay also. The operation of the relay board will be discussed later on another blog.

Source Code:

Video:

January 09, 2021

IoT Using Blynk - Blinking LED Widget

We already blinked the built-in LED of NodeMCU. We have also discussed the Blynk App, how to install and set it up. Now we will go for the Led of Blynk app. These Widgets act as virtual hardware. Our Aim is to blink the Virtual LED with the actual LED in NodeMCU.

If you are new then follow the Step by Step Blynk Installation Guide to install the Blynk app on your phone. If you are using NodeMCU for the first time then you have to add NodeMCU to your Arduino IDE. Please follow the step-by-step tutorial for Programming NodeMCU Step by Step Using Arduino IDE.

In our last blog, we got a mail from Blynk which has Auth Token. This Auth Token is a unique identifier that is particularly dedicated to a controller or hardwire. Think of it as your identity number of the NodeMCU. With this ID number, Blynk identifies your controller and differentiates it from all other controllers that are running by others all around the globe.

For this project, we will only need 

  • NodeMCU 

  •  Blynk App Installed in a Android Phone 

Step 1: Open Arduino IDE.


Step 2: Copy-Paste the code there.


Step 3: Copy the Auth-Code that is sent to your mail-id. Just delete YourAuthToken and paste your auth code there. Then delete YourNetworkName and write your WiFi router or phones hotspot name there. Finally, delete YourPassword and put your Wi-Fi or hotspot password.

Step 4: Click on Tools and make sure that you have selected the right device and the right port. For me its NodeMCU and COM11. (For you it may not be COM11 so check before uploading)

Step 5: Finally, save the code and hit the upload button. 

Then go to the settings of the LED Widget. You can do it by tapping on the LED widget. Set V1 as the Input.


Video: IoT Using NodeMCU and Blynk

Source Code:


January 08, 2021

Blynk

Blynk is a free IoT platform. Let's set up Blynk step by step.

Step 1: Open play store, search for the app Blynk and install the app.


Step 2: Install the app in your device.

Step 3: Find the app icon looks like the one shown below. Then open it.

Step 4: If you have an account log in otherwise click on Create New Account. You can log in using your Facebook account also.

Step 5: Enter your email id and then create a password and enter it. Note that this is not your email id's password. You have to create a different password.

Step 6: Click Sign Up

Step 7: Read the note and Click on Cool! Got it. This service is not totally free but partially free. We will discuss it later.

Step 8: Now its time to make a new project. Click on New Project.

Step 9: Click Project Name to edit it and give it a new name.

Step 10: In my case, I've chosen Test Project.

Step 11: Then Click the drop-down menu and find the controller you are using and select OK. In my case, I have chosen NodeMCU because in my last blog was about programming NodeMCU.

Step 12: Select Connection Type as Wi-Fi and click Create.

Step 13: Click ok and find the Auth token from your email id. We will discuss this Auth Token and how to use it in our next blog. 


Step 14: This is a blank project. Now you have to add some widgets. Now, these widgets are not free. You get only 2000 Units of energy and this energy you have spent to get a widget. The declaration in Step 7 was about this.

Step 15: There are various types of widgets and all have prise. So choose your weapon wisely.

I'll discuss some of these widgets later in another blog.


December 17, 2020

Programming NodeMCU Step by Step Using Arduino IDE

Programming NodeMCU is as easy as programming as Arduino UNO. You just have to equip your Arduino IDE.

First Connect the NodeMCU to your PC or Laptop using a micro USB data cable.

Then go to the link (NodeMCU Driver) to download the driver. Download and Extract the driver and install it.

Now open the Arduino IDE and go to File > Preferences 

In the Preferences window, you will find Additional Boards Manager URLs. Just copy the line below and paste it there.

http://arduino.esp8266.com/stable/package_esp8266com_index.json


Then close the IDE and reopen it.

Now go to Tools > Board: > Boards Manager


Open the Boards Manager and search for nodemcu.


Then install the most updated version from there.

That's all you have to do. Now let's check what changes have come.


Now lets program nodeMCU with a basic example program Blink. 
Go to File > Examples > Basic > Blink

Now Go to Tools > Boards: and select NodeMCU


After selecting the board go to Port and select the right communication port. Hit the Upload button.


The upload may take a few seconds and after that, you will find a screen like this stating that uploading is done. During the upload the led near pin D0 might blink several times but after the uploading is complete the led will keep glowing for 1 sec and staying off for 1 second.


Video: Coming Soon

NodeMCU Driver Link: https://github.com/nodemcu/nodemcu-devkit/tree/master/Drivers